
Celebrate Milestones with Top 5 18th Birthday Card DIY Ideas
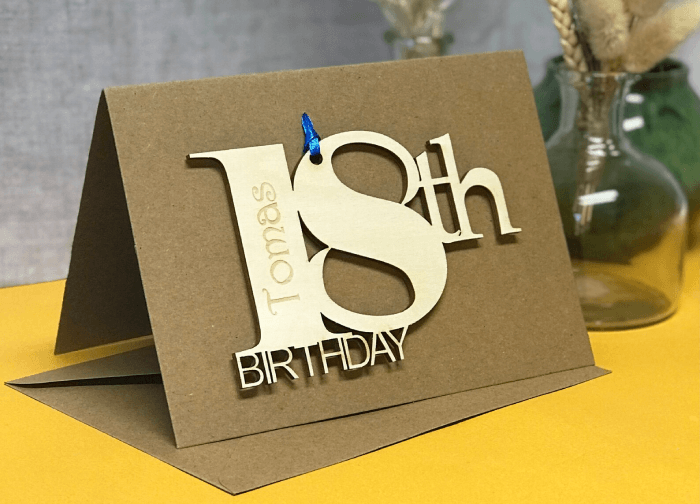
Crafting a personalised 18th birthday card is a delightful way to add a unique and heartfelt touch to a milestone celebration. In this article, we delve into the charm of handcrafting these cards creatively, inviting you to explore a collection of top 5 DIY ideas for an 18th birthday card DIY that will elevate your 18th birthday wishes to new heights.
Embracing Significance with Meaningful Decor Elements for DIY 18th Birthday Cards
As we enter the realm of DIY 18th birthday card ideas, we recognize the special significance this milestone holds. The transition to adulthood is marked by newfound freedoms and responsibilities, making it a momentous occasion. When creating DIY birthday cards, it becomes essential to incorporate decor elements that symbolise the importance of this age.
Choosing decor elements that align with the celebrant’s personality and interests is key. Here, Giftideas suggest top 5 decor elements to have for your 18th birthday card DIY decoration:
- Keys: Symbolising unlocking new opportunities and paths as the celebrant steps into adulthood, keys add a sense of adventure and growth to the 18th birthday card.
- Doors: Representing the opening of new chapters, doors signify the exciting journey ahead. Incorporating doors in the design adds a touch of anticipation and the beginning of meaningful experiences.

- Stars: Evoking dreams and aspirations, stars symbolise the limitless possibilities that come with turning 18. Including stars in the decor of your 18th birthday card DIY brings a sense of hope, inspiration, and a bright future.
- Quills: Reflecting the power of self-expression, quills signify the ability to articulate thoughts and emotions. This element adds an artistic touch, encouraging the celebrant to embrace their unique voice and creativity.
- Balloons: Signifying celebration and joy, balloons bring a festive atmosphere to the DIY card. As 18 is a significant milestone, balloons convey a sense of excitement and cheer, making the card a true expression of celebration.
Including these elements in your DIY card not only adds aesthetic appeal but also imbues the card with deeper meaning.
Suggesting Top 5 Must-try Ideas for A Special 18th Birthday Card DIY
Choosing to craft a special 18th birthday card opens the door to creativity and heartfelt expression. In this section, we present the top 5 must-try decor and DIY ideas that will elevate your DIY card game to new heights. Whether you’re a seasoned crafter or a beginner, these DIY 18th birthday card ideas promise to add a personal touch and make the 18th birthday celebration truly unforgettable.
Interactive Pull-tab Greeting for a Special 18th Birthday
Crafting an engaging and interactive DIY 18th birthday card adds an extra layer of surprise and delight to the celebratory occasion. Follow these steps to create a memorable handcrafted birthday card with pull-tab features that unveil hidden messages, personalised wishes, or fun facts as the tab is pulled:
Materials Needed:
- Sturdy cardstock or paper (for the card base)
- Decorative paper or fabric
- Scissors
- Glue
- Markers
- Ruler
- Pencil
- Optional: Stamps, stickers, or other decorative elements
Step 1: Design the Card Base
- Choose the size and shape of your card. A standard rectangular shape works well, or you can get creative with a unique design.
- Cut the cardstock to the desired size and fold it in half to create the card.
Step 2: Create Pull-tab Sections
- Determine where you want the pull-tab to be located on your 18th birthday card DIY. This can be at the top, bottom, or sides.
- Use a ruler and pencil to mark the area where the pull-tab will slide in and out.
- Carefully cut slits along the marked area. Ensure that the slits are wide enough for the pull-tab to move smoothly.

Step 3: Craft the Pull-tab
- Cut a strip of decorative paper or fabric to serve as the pull-tab. Ensure that it is long enough to extend beyond the card when pulled.
- Decorate the pull-tab with markers, stamps, or stickers. Add a message or symbol that represents the 18th birthday celebration.
Step 4: Personalise Messages
- Write or print personalised messages, birthday wishes, or fun facts on small pieces of paper.
- Attach these messages to the pull-tab using glue. Make sure they are positioned in such a way that they are revealed as the pull-tab is engaged.
Step 5: Assemble and Decorate
- Insert the pull-tab through the slits in the 18th birthday card DIY, ensuring that it moves smoothly.
- Decorate the card with additional elements such as stickers, drawings, or any other decorative touches that align with the 18th birthday theme.
Step 6: Review and Refine
- Test the pull-tab to make sure all messages are revealed smoothly.
- Refine any details, ensuring that the DIY card for 18th birthday looks polished and functions well.
Step 7: Present Your Creation
- Express the sentiment behind each message when presenting the card.
- Witness the joy on the recipient’s face as they discover the personalised surprises hidden within the card, making their 18th birthday celebration truly special.
Quilled Paper Artistry as A Unique Idea for 18th Birthday Card DIY
Embrace the art of quilled paper to create a truly distinctive 18th birthday card that captivates with its intricate beauty. Elevating your DIY card to a work of art, follow these steps to infuse the celebratory occasion with creativity and personal touch:
Materials Needed:
- Sturdy cardstock or paper for the card base
- Quilling paper strips in various colours
- Quilling tool
- Glue
- Scissors
- Markers or pens for additional detailing
- Optional: Stamps, stickers, or other decorative elements
Step 1: Design the Card Base
- Choose a card size and shape that complements the quilled paper artistry. A standard rectangular shape provides an elegant canvas, but feel free to experiment with unique designs that reflect the celebrant’s style.
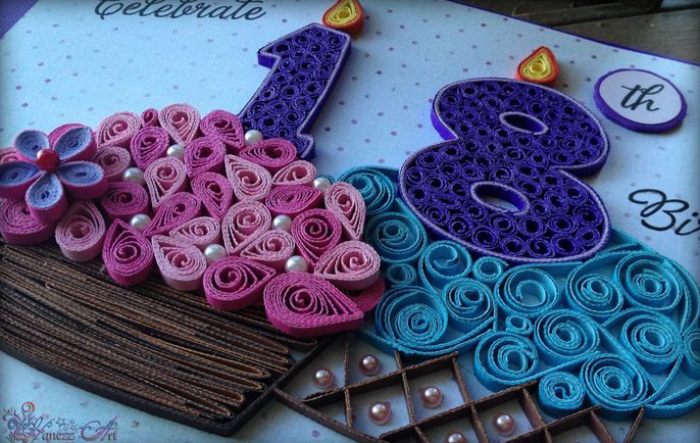
Step 2: Quilling Magic
- Using the quilling tool, shape the paper strips into coils, scrolls, and various designs. Craft quilled elements for your 18th birthday card DIY that symbolise the joyous transition to adulthood – perhaps intricate patterns, keys, or symbolic numbers like ’18’.
Step 3: Attach Quilled Elements
- Carefully glue the quilled elements onto the card base, arranging them thoughtfully to create a visually appealing composition. Allow your creativity to shine, incorporating vibrant colours and dynamic shapes.
Step 4: Personalise with Messages
- Craft personalised messages, heartfelt happy 18th birthday wishes, or meaningful quotes to complement the quilled artwork. Attach these messages strategically, ensuring they seamlessly integrate with the quilled design.
Step 5: Final Touches
- Add any additional decorative elements, such as stamps, stickers, or drawings, to enhance the overall aesthetic. Ensure that the card feels cohesive and resonates with the celebratory theme.
Step 6: Review and Refine
- Take a moment to review your quilled masterpiece. Ensure that all elements are securely attached, and refine any details to achieve a polished and harmonious look.
Step 7: Present Your Quilled Creation
- Express the sentiment behind each quilled element and message when presenting the card. Watch as the recipient discovers the intricate artistry, making their 18th birthday celebration an extraordinary and visually enchanting experience.
Watercolour Wash Elegance for An Outstanding 18th Birthday Card
Unlock the beauty of watercolour with this exceptional DIY 18th birthday card, infusing elegance and artistic flair into your heartfelt wishes. Follow these steps to create an outstanding and visually enchanting 18th birthday card DIY:
Materials Needed:
- Sturdy watercolour paper or cardstock for the card base
- Watercolour paints in desired hues
- Paintbrushes of various sizes
- Water and a palette for mixing colours
- Optional: Masking fluid, salt, or other watercolour techniques for added texture
Step 1: Design the Card Base
- Select watercolour paper or cardstock that complements the watercolour aesthetic. Opt for a standard shape or get creative with a unique design that resonates with the celebrant’s personality.

Step 2: Watercolour Magic Unleashed
- Dip your paintbrush into the watercolour palette, choosing a palette that aligns with the celebratory theme. Apply gentle strokes or vibrant washes onto the card base, creating an ethereal background. Experiment with blending and layering for added depth.
Step 3: Explore Watercolour Techniques
- Consider incorporating additional watercolour techniques for a truly exceptional result. Use masking fluid to create reserved areas, sprinkle salt for unique textures, or experiment with other methods that elevate the overall elegance of your design.
Step 4: Personalise with Messages
- Once the watercolour wash has dried, add personalised messages, heartfelt birthday wishes, or quotes using a fine-tip pen or marker. Ensure the chosen ink for your 18th birthday card DIY complements the watercolour tones.
Step 5: Final Touches
- Enhance the visual appeal by adding subtle details or embellishments. Consider metallic accents, pressed flowers, or even a delicate wash of shimmer for an added touch of elegance.
Step 6: Review and Refine
- Take a moment to review your watercolour creation for your DIY card for 18th birthday. Ensure that the colours are harmonious, the messages stand out, and the overall design exudes the elegance you envisioned.
Step 7: Present Your Watercolour Masterpiece
- Show the sentiment behind the artistic watercolour design when presenting the card. Witness the recipient’s awe as they experience the outstanding and unique elegance of this handcrafted 18th birthday card.
Playful Surprises with Pop-up DIY 18th Birthday Card
Step into the realm of playful surprises by crafting a dynamic pop-up DIY 18th birthday card that promises to amaze and captivate. Follow these steps to infuse whimsy and joy into your celebratory wishes:
Materials Needed:
- Sturdy cardstock or paper for the base of this 18th birthday card DIY
- Decorative paper or patterned cardstock for the pop-up elements
- Scissors
- Glue
- Markers or pens for additional detailing
- Ruler
- Pencil
- Optional: Stamps, stickers, or other decorative elements
Step 1: Design the Card Base
- Choose a card size and shape that accommodates the pop-up surprise. A standard rectangular shape works well, but feel free to experiment with unconventional designs that add a playful touch.

Step 2: Create Pop-up Elements
- On a separate piece of paper, design and cut out the pop-up elements. Consider shapes like balloons, numbers ’18’, or symbols that hold personal significance. Ensure they are smaller than your 18th birthday card DIY dimensions to fit seamlessly.
Step 3: Fold and Position Pop-ups
- Carefully fold the pop-up elements along their central axis. Open the card and position the folded elements inside, ensuring they align with the chosen locations for the surprise. Mark these positions lightly with a pencil.
Step 4: Attach Pop-ups to Card Base
- Apply glue to the folded sections of the pop-up elements and affix them to the marked locations inside the card. Close the card gently, pressing down to secure the pop-ups in place.
Step 5: Personalise with Messages
- Craft personalised messages, birthday wishes, or funny anecdotes to accompany the pop-up surprise. Write or print these messages and strategically place them around the pop-up elements for an interactive experience.
Step 6: Decorate and Refine
- Add additional decorative elements such as stamps, stickers, or drawings to enhance the overall aesthetic. Ensure the card looks cohesive and reflects the celebratory theme. Refine any details for a polished finish.
Step 7: Present Your Playful Pop-up Creation
- Embrace the joy and excitement behind the pop-up surprise when presenting your 18th birthday card DIY. Watch as the recipient experiences the playful and unexpected elements unfolding, making their 18th birthday celebration truly delightful.
Light-Up Constellation DIY Card for 18th Birthday
Why not illuminate the celebration with a mesmerising light-up constellation DIY card that adds a celestial touch to the 18th birthday wishes? Follow these steps to create a stunning cosmic masterpiece:
Materials Needed:
- Sturdy cardstock or paper for the card base
- Battery-operated LED lights or fairy lights
- Small switch or button for light control
- Pencil
- Craft knife or scissors
- Decorative paper or markers for constellation patterns
- Glue
- Optional: Stamps, stickers, or other celestial embellishments
Step 1: Design the Card Base
- Choose a card size and shape that accommodates the celestial theme. Consider a dark-coloured cardstock for a night-sky effect, enhancing the glow of the constellations.
Step 2: Plan Constellation Patterns
- Research and plan the constellation patterns you want to feature on the 18th birthday card DIY. Use a pencil to lightly mark the positions of stars on the card, creating a realistic representation of the night sky.

Step 3: Cut Out Constellation Patterns
- Using a craft knife or scissors, carefully cut out the marked positions on the cardstock to create windows for the constellation patterns. Ensure these cutouts align with your planned designs.
Step 4: Decorate with Constellations
- On a separate piece of paper, draw or cut out constellation patterns. Glue them behind the cutout windows on the card base. Add optional celestial embellishments such as moons or planets.
Step 5: Integrate LED Lights
- Position the battery-operated LED lights on the card, placing them behind the constellation cutouts. Ensure the lights are evenly distributed for a twinkling effect. Attach a small switch or button to control the illumination for your 18th birthday card DIY.
Step 6: Personalise with Messages
- Craft personalised messages, birthday wishes, or cosmic quotes to accompany the constellation design. Place these messages strategically around the card, ensuring they complement the celestial theme.
Step 7: Decorate and Refine
- Enhance the overall aesthetic by adding optional stamps, stickers, or drawings related to the night sky. Refine any details to create a polished and cohesive look.
Step 8: Present Your Celestial Creation
- Express the wonder and beauty of the cosmos when presenting the card. Watch as the recipient experiences the captivating glow of the constellations, making their 18th birthday celebration truly stellar.
Creating Surprises with Unique Ways of Giving DIY Birthday Cards
As much as choosing the perfect 18th birthday card ideas is a joy, the manner in which you present it can be equally impactful. Consider different ways to surprise the birthday person with your 18th birthday card DIY. Now, let’s explore with us most surprising ways to send your handcrafted card:
- Message in a Balloon: Insert the DIY 18th birthday card into a helium balloon, creating a whimsical surprise. When the balloon is popped, the card floats out, unveiling heartfelt wishes in an unexpected manner.
- Parcel of Memories: Craft a custom gift box containing the DIY card, surrounded by nostalgic items and mementos. The act of unwrapping becomes a journey through cherished memories, enhancing the sentimental value of the card.

- Mystery Mail: Send the 18th birthday card DIY in a sealed envelope marked ‘Open on Your 18th.’ The intrigue of the unopened envelope builds anticipation, offering a suspenseful and memorable reveal.
- Scavenger Hunt Card Delivery: Hide portions of the card at various locations, leading the recipient on a scavenger hunt. As they gather each piece, the complete message unfolds, turning the card into an adventure.
- Digital Surprise: Scan the DIY card and embed a QR code. When scanned, the code directs the recipient to a personalised online message or video, adding a modern and tech-savvy twist to the traditional card-giving experience.
Conclusion
In the art of crafting a unique 18th birthday card DIY, each stroke of creativity is a celebration of milestones and cherished memories. Embrace the joy of creating something unique and personal for your loved ones.
Whether you choose an interactive pull-tab design, intricate quilled paper artistry, or a light-up constellation theme, the effort you put into crafting a DIY card speaks volumes. Enjoy the process, savour the moments, and witness the delight your handcrafted creation brings to the 18th birthday celebration.
Cheers to embracing milestones with creativity and love!