
Ultimate Guide to Making A 3D Birthday Card DIY Simply
Ready to add a dash of creativity to your gifting game? In this guide, we’re unwrapping the secrets of making a 3D birthday card DIY that aren’t just cards—they’re expressions of love and artistic flair.
Why Choose A3D DIY Birthday Card
When it comes to expressing love and celebration, a 3D birthday card DIY stands out as a captivating choice. Here are five compelling reasons why opting for a 3D birthday card is not just an idea but an enchanting experience:
- Personalised Masterpiece: A 3D DIY birthday card allows you to transform a simple greeting into a personalised masterpiece. By adding layers and depth to your creation, you’re not just sending a card; you’re gifting a piece of art tailored to the recipient’s personality and preferences.
- Visual Impact: The three-dimensional aspect of these cards adds a visual wow factor that goes beyond the flat, conventional alternatives. The recipient is greeted with a delightful surprise as they unfold your creation, making the DIY birthday card a memorable and visually striking experience.

- Therapeutic Crafting: Crafting a 3D birthday card DIY is also a therapeutic and enjoyable journey. The hands-on process of cutting, folding, and assembling engages your creativity and provides a calming escape, turning the act of card-making into a joyful experience.
- Thoughtful Gesture: The time and effort invested in crafting such a unique card convey a level of care and consideration that surpasses the quick click of an e-card.
- Keepsake Quality: Unlike traditional cards that may be discarded after a short display, a 3D DIY birthday card has keepsake quality. Its dimensional design makes it more likely to be cherished and displayed for an extended period, serving as a lasting reminder of the special occasion.
Ultimate Guide to Making A 3D Birthday Card DIY Easily
Crafting a 3D birthday card is a delightful way to transform your heartfelt wishes into a tangible work of art. In this section, we’ll guide you on how to make a DIY 3D birthday card, from gathering materials to adding the finishing touches, all guided by Gift Ideas. Let’s embark on this creative journey together and bring your imaginative designs to life!

Material Need
To bring your 3D birthday card DIY vision to life, gather the following materials:
- Sturdy Cardstock: Begin with a robust cardstock as the foundation of your card, ensuring durability and stability.
- Scissors: Precision is key, so equip yourself with a reliable pair of scissors for accurate cutting.
- Glue or Adhesive: Choose a glue or adhesive suitable for paper crafting to securely attach the various layers of your card.
- Coloured Markers: Add a splash of vibrancy to your creation with an array of colourful markers.
- Embellishments: Elevate your card’s visual appeal with embellishments such as ribbons, sequins, or small trinkets.
These basic materials lay the groundwork for your artistic journey into the world of 3D birthday card crafting.
See More: Step-by-step Instruction to Make Dinosaur Birthday Card DIY
Theme for 3D Birthday Card DIY
Selecting a theme is a crucial step that adds a personalised touch to your 3D birthday card. Consider the recipient’s interests, hobbies, or the occasion itself. Here are some DIY 3D birthday card ideas to spark your creativity:
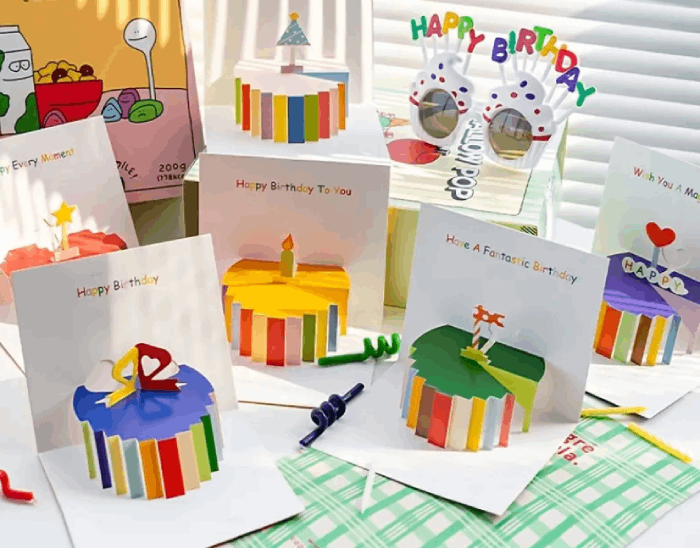
- Balloon Bonanza
Balloons symbolise joy and celebration, making them a perfect choice for a birthday card. The pop-up design captures the essence of a festive atmosphere, creating an instant sense of happiness when the card is opened.
- Cupcake Carnival
Cupcakes are synonymous with birthdays and sweet celebrations. Crafting a 3D cupcake adds a delightful touch, and the pop-up feature makes it a charming surprise for the recipient, creating a visually pleasing and joyous experience.

- Party Hat Extravaganza
Party hats are iconic elements of celebrations. Choosing this theme adds a playful and festive vibe to the 3D birthday card DIY. The DIY 3D birthday card pop up enhances the sense of excitement, making the card feel like a miniature birthday party in itself.
- Heartfelt Blossoms
Hearts are timeless symbols of love and affection. A garden of hearts that unfolds symbolises the blossoming of emotions, making it a touching theme for expressing heartfelt birthday wishes. The layered effect adds visual interest and depth to the DIY 3D birthday card ideas design.
- Surprise Gift Box
A gift box theme is a classic representation of birthdays and surprises. The 3D pop-up gift box adds an element of excitement, symbolising the joy of receiving a special gift. It’s a theme that resonates with the essence of gift-giving on birthdays.
Step-by-step to Make 3D Birthday Card DIY
Creating a stunning a DIY 3D birthday card is an exciting and fulfilling endeavour. Follow this straightforward step-by-step guide on Decor & DIY easily:
Step 1: Design and Fold
- Sketch Your Pop-Up Element: Begin by lightly sketching your chosen 3D design (cake, flower, animal, etc.) on cardstock. Keep it simple, focusing on basic shapes.
- Fold the Base Card: Create the card base by folding your main cardstock sheet in half. This sets the foundation for your 3D masterpiece.
- Cut Out the Pop-Up Element: Carefully cut out your sketched design, leaving a small tab attached to the base card for later glueing.
Step 2: Build the Dimension
- Score and Fold the Pop-Up Element: Gently score and fold the pop-up element along lines that will create depth and dimension. Think box folds for a cake or petal folds for a flower.
- Attach the Pop-Up Element: Apply glue to the tab and carefully adhere it to the inside of the card base. Ensure the folds create the desired 3D effect.

Step 3: Decorate and Personalise
- Let Your Creativity Run Wild: Decorate your 3D birthday card DIY with additional elements like coloured cardstock layers, embellishments, ribbons, and glitter. It’s your masterpiece—have fun with it!
- Write a Heartfelt Message: Personalise your card with a handwritten message on the blank space inside.
Bonus Tips
- Use Double-Sided Tape: Ensure extra stability, especially with heavier pop-up elements, by using small pieces of double-sided tape alongside the glue.
- Practice Makes Perfect: Don’t hesitate to try a few practice cuts before diving into your final card.
- Get Creative with Materials: Explore unique materials like upcycled buttons for cake decorations, tissue paper for fluffy flower petals, or colourful origami elements for an extra wow factor.
Remember, the most important ingredients are your imagination and love. So, grab your supplies, channel your inner artist, and watch your 3D birthday card masterpiece come to life! Your creativity knows no bounds!
FAQs
Q1: Can I make a 3D birthday card without specialised tools?
Absolutely! Crafting a 3D birthday card DIY doesn’t require intricate tools. Basic supplies such as scissors, glue, and coloured markers are sufficient to create a stunning card. While specialised tools can enhance the process, the essence of 3D card-making lies in simplicity and creativity.
Q2: Can kids make their own 3D birthday cards?
Certainly! 3D birthday card crafting is a fantastic activity for kids. With supervision and assistance, children can enjoy the creative process. Opt for easy-to-execute themes and ensure that the materials used are child-friendly. It’s a wonderful opportunity for kids to express their creativity and create heartfelt gifts.
Q5: What if I mess up? Will my card be a cardboard catastrophe?
Fear not! In the world of 3D card crafting, imperfections can often turn into unique quirks that make your card special. Embrace any mishaps, and remember that the essence lies in the effort and thought put into the creation, rather than flawless execution.
Q4: Can I add a photo to a DIY 3D card?
Certainly! Including a photo in your DIY 3D card is a wonderful way to add a personal touch. Choose a photo that encapsulates a special memory or moment, and integrate it seamlessly into the design. This not only enhances the visual appeal of the card but also makes it a cherished keepsake.
In conclusion, the journey of creating a 3D birthday card DIY transcends the ordinary. It’s a testament to the power of creativity and the joy of personalised gestures. Dive into this artistic adventure, unleash your imagination, and transform a simple card into a cherished memory. Elevate your greetings, one dimension at a time, with the magic of 3D DIY birthday cards.